If you have ever stood in your yard and looked up at your roof, you may have asked yourself, Can I reroof my own house? It is a fair question. Roofing jobs can look expensive when a contractor quotes the work. For many homeowners, the idea of doing it themselves feels like a smart way to save money.
That is why a good reroofing guide matters. Before you climb a ladder or start tearing off shingles, you need to understand the real risks, the tools involved, the steps to follow, and when it is better to call a professional. A roof is not just another weekend project. It is a major part of your home’s structure and weather protection.
Can I Reroof My Own House?
The short answer
Yes, you can reroof your own house in many cases, but there are conditions.
The real answer depends on your roof type, your comfort with physical work, your local building rules, and your skill level. Some homeowners can handle a simple roof replacement on a low, single-story house with basic asphalt shingles. Others should not try it at all.
A roof is a large, exposed workspace. You will be working at height, carrying heavy materials, and removing old roofing while protecting the structure below. If that sounds manageable and your roof is simple, a DIY roof replacement may be possible. If not, it is safer to hire help.
Factors that affect whether DIY reroofing is possible
Before you decide, ask yourself these questions:
- Do local building codes allow DIY roofing?
- Will you need a permit?
- Is the roof low and easy to access?
- How steep is the pitch?
- What type of roofing material are you using?
- Do you have enough experience to work safely and correctly?
Some cities or counties require permits and inspections before or after a roof replacement. Others may have rules about how many layers of shingles can stay on the roof. In some places, licensed contractors are preferred or required for certain roofing systems.
The shape of the roof matters too. A low-slope, single-section roof is much easier than a steep roof with valleys, dormers, skylights, and chimneys. The more detailed the design, the more opportunities there are for leaks if the work is not done carefully.
When DIY reroofing is not recommended
There are times when the answer to Can I reroof my own house should honestly be no.
Do not try it yourself if you have:
- A steep roof that is hard to stand on safely
- A multi-story house
- Signs of structural damage
- Major leaks or rot in the roof deck
- Complex roofing details like skylights, chimneys, or multiple valleys
- No experience with heavy construction or fall protection
These situations raise both the danger level and the chance of costly mistakes.
The risks of doing it yourself
DIY roofing can save money, but the risks are real.
First, there is the safety risk. Falls are one of the biggest dangers in roofing. A slippery surface, a sudden gust of wind, or a bad step can lead to serious injury.
Second, there is the risk of water damage. Even small mistakes in underlayment, flashing, or shingle placement can allow water to enter your home. Once water gets in, damage can spread quietly behind the scenes.
Third, there is the risk of money. If you make a mistake and have to fix it later, the project may end up costing more than hiring a roofer in the first place.
So yes, can I reroof my own house? Sometimes. But the better question may be, should I reroof my own house? That depends on your roof and your ability to work safely and carefully.
Understanding Roof Types Before You Start
Why roof type matters
Not all roofs are the same. Some are simple and DIY-friendly, while others are more difficult and require specialized tools or experience. Before you begin any DIY roof replacement, you need to know what kind of roof you have and what that means for the job.
Common roof types
Asphalt shingles
This is the most common roofing material in many areas and the easiest for beginners to understand. Asphalt shingles come in layered pieces and are usually installed in rows. Because they are common, many guides, tools, and materials are available for them.
DIY difficulty: Moderate to beginner-friendly
Best for: Homeowners with basic construction skills
Metal roofing
Metal roofs last a long time, but they are not always simple to install. Panels must line up correctly, fasteners must be placed properly, and expansion needs to be considered. One mistake can create leaks or noise issues.
DIY difficulty: Moderate to difficult
Best for: Homeowners with some building experience
Clay tiles
Clay tile roofs are heavy and fragile. They can crack easily, and the roof structure must support the load. This type of roofing is usually not a beginner’s job.
DIY difficulty: Difficult
Best for: Professionals or advanced DIYers
Flat roofs
Flat or low-slope roofs use different materials, such as rolled roofing or membrane systems. These roofs often depend heavily on waterproof sealing and careful surface preparation. Even small errors can cause pooling water and leaks.
DIY difficulty: Moderate to difficult
Best for: Experienced homeowners
Which roofs are DIY-friendly?
If you are asking Can I reroof my own house, the easiest answer is usually yes, only if your roof is:
- Low in height
- Simple in shape
- Covered with asphalt shingles
- In good structural condition
- Accessible with safe ladder access
A simple roof gives you a better chance of success. The more complex the roof, the more likely you are to need a professional.
Roof difficulty comparison table
Roof TypeDIY DifficultyMain ChallengeBest For
Asphalt shingles Low to moderate Learning proper nailing and overlap Most homeowners.
Metal roofing Moderate to high Panel alignment and fastening Skilled DIYers
Clay tiles High Weight, breakage, and support needs Professionals
Flat roof systems Moderate to high Waterproof sealing and drainage Experienced builders
This table is a good reminder that the best roof for a DIY project is usually the simplest one.
Tools and Materials Needed for Reroofing
Safety equipment comes first.
Before you think about shingles or nails, think about safety. Roofing is not the place to skip protection. A small fall can become a major accident.
You should have:
- Harness and fall protection gear
- Work gloves
- Non-slip boots
- Protective helmet or hard hat
- Eye protection
If your roof is steep or higher than one story, fall protection becomes even more important. Do not assume you can “just be careful.” On a roof, you need real protection, not just good intentions.
Roofing tools you will likely need
For a reroofing guide to be useful, it has to include the basic tools. Here are the core items most homeowners need:
- Hammer or nail gun
- Utility knife
- Pry bar
- Ladder
- Tape measure
- Chalk line
- Roofing shovel or tear-off tool
- Tin snips, if needed
- Caulking gun
A nail gun can speed up the job, but only if you know how to use it correctly. If not, a hammer may be safer and easier for a first-time project.
Materials for the roof replacement
You will also need the actual roofing materials. For a standard asphalt shingle roof, the list usually includes:
- Shingles
- Underlayment
- Roofing nails
- Drip edge
- Flashing
- Sealant
- Ridge cap shingles
- Starter strip shingles
These parts work together. The shingles are only one layer. The underlayment, flashing, and drip edge help keep water out and protect weak spots.
Why good materials matter
Cheap materials may seem like a shortcut, but they can create more work later. A roof needs to handle wind, rain, sun, and temperature changes. When you choose strong materials, you reduce the chance of leaks and repairs.
If you are wondering if you can reroof your own house and still get professional-looking results, the answer often depends on whether you use the right materials in the right way.
Preparing for Reroofing
Inspect the existing roof first.
Before you remove anything, take time to inspect the roof from the ground and, if safe, from the attic or a secure access point. Look for:
- Missing or curled shingles
- Sagging areas
- Water stains inside the attic
- Rot or soft spots
- Damaged flashing around chimneys or vents
This step helps you determine whether the roof is truly ready for a reroof or if there are deeper problems beneath.
Check for structural damage.
A roof covering can hide much bigger issues. If the wood deck is rotten, the rafters are damaged, or the roof has serious sagging, you need repairs before any new shingles go on.
Do not ignore this step. Installing new shingles over damaged wood is like putting a fresh coat of paint on a broken wall. It may look better for a moment, but the real problem stays hidden.
Get permits if required.
Many homeowners forget this part. Depending on where you live, roof replacement may require a permit. Some places also want an inspection when the job is done.
Check with your local building office before you begin. This helps you avoid fines and keeps your project legal and safe.
Choose good weather
Roofing should happen during dry weather. Rain makes the roof slippery and increases the risk of water entering the structure. Strong winds can also make it hard to handle materials safely.
The best time for a roof replacement is during a stretch of clear, dry weather. You want enough time to remove the old roof, inspect the deck, and install the new layers without rushing.
Plan for tear-off and disposal.
Old shingles are heavy. Once removed, they need to go somewhere. That means planning for:
- A dumpster or disposal bin
- A safe drop area for debris
- A way to protect landscaping and walkways
If you do not plan, the tear-off phase can become messy fast.
A simple pre-installation checklist
Before starting, make sure you have:
- Checked the roof condition
- Confirmed the roof is structurally sound
- Verified permit requirements
- Chosen a dry weather window
- Arranged debris disposal
- Gathered all tools and materials
Good preparation makes the actual roofing work much easier and safer.
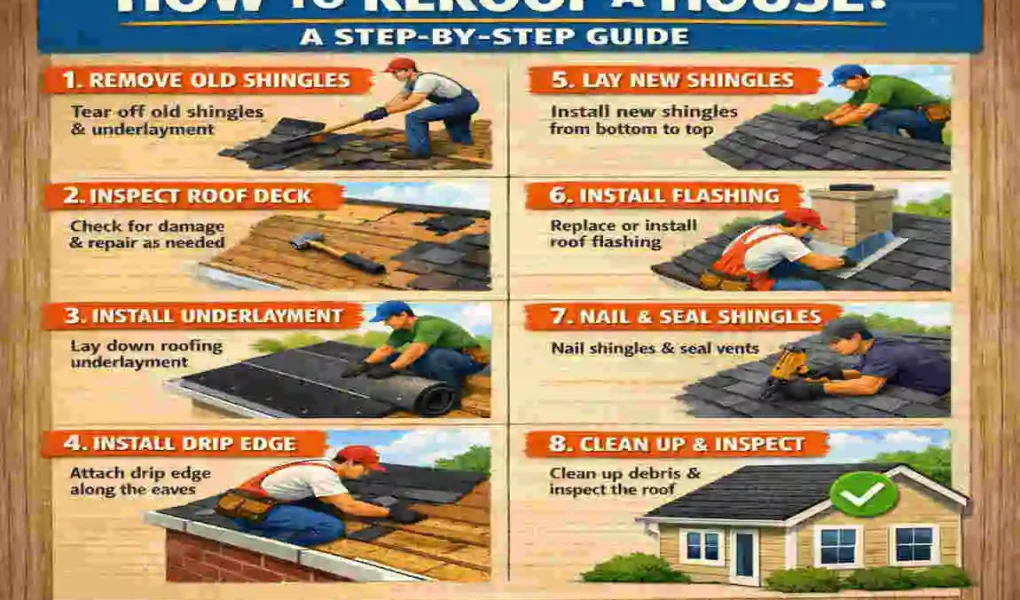
Step-by-Step Guide: How to Reroof Your House
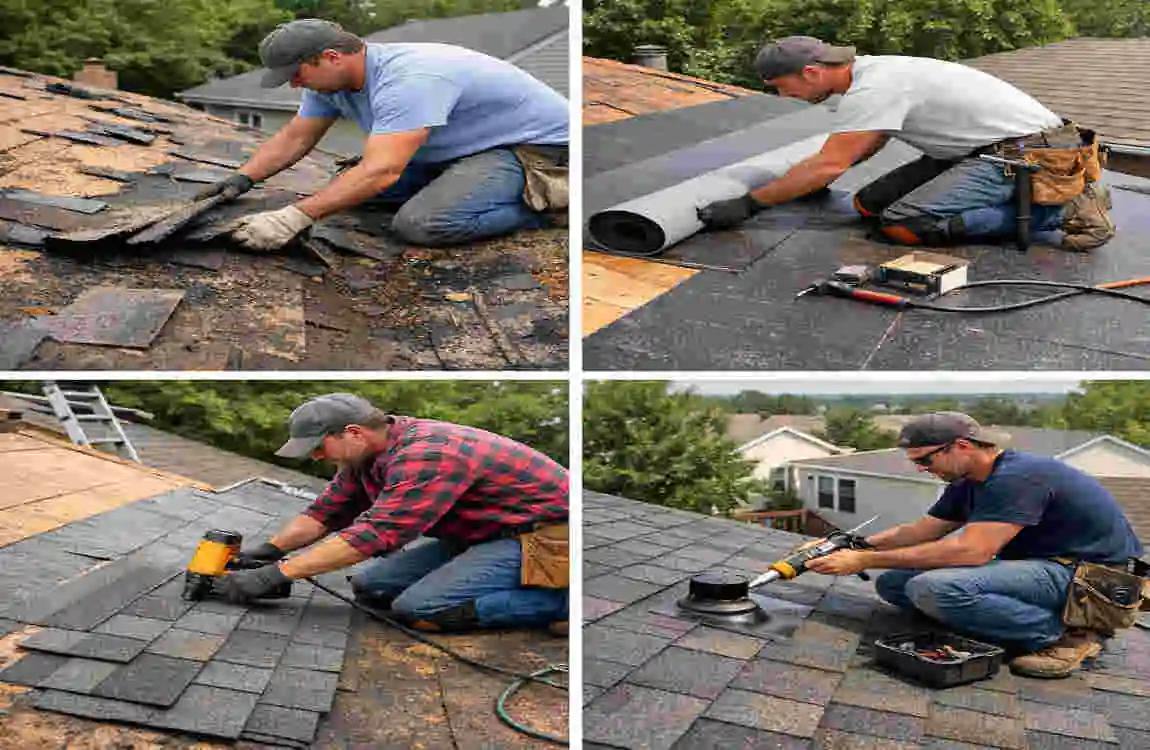
Remove old roofing materials.
This is where the real work begins.
Start at the top and work down carefully. Use a roofing shovel, pry bar, or tear-off tool to lift shingles and remove nails. Work in small sections so debris does not pile up too heavily on the roof.
Keep your footing stable. Remove materials in a controlled way, not all at once. Watch for loose nails sticking up from the deck, because they can cut your shoes or make you trip.
As you strip away the old roof, pay attention to what you find underneath. If you notice soft wood, mold, or water damage, stop and inspect the area more closely.
Once the old shingles are off, sweep the roof deck clean. A smooth, clean surface makes the next steps easier and safer.
Inspect and repair the roof deck.
After tear-off, the roof deck is exposed. This is your chance to see the true condition of the structure.
Look for:
- Rotting plywood
- Cracked boards
- Soft spots
- Water damage
- Loose or missing sections
If you find damaged plywood or sheathing, replace it before moving forward. A roof covering should go over a solid base. If the base is weak, your new roof will not last as long as it should.
This part can feel time-consuming, but it is one of the most important steps in roof replacement. A strong deck supports the whole system.
Install underlayment
Underlayment is a protective layer that goes between the roof deck and the shingles. Think of it as a backup barrier against water.
Why does it matter so much? Because shingles alone do not stop every drop of rain. Wind-driven rain, ice, and small gaps can let water through. Underlayment adds extra protection.
To install it, roll it out smoothly across the roof deck and secure it according to the manufacturer’s instructions. Make sure each layer overlaps the one below it in the correct direction so water flows down and off the roof.
If you want to understand how to properly reroof a house, this step is essential. Skipping underlayment is one of the fastest ways to shorten the life of your new roof.
Install drip edge and flashing.
Drip edge is the metal trim installed along the roof edges. It helps direct water away from the wood structure and into the gutters. Flashing is used around weak points like chimneys, valleys, vents, and skylights.
These parts may not look flashy, but they do a lot of the heavy lifting when it comes to waterproofing.
Install drip edge along the eaves and rakes as needed. Then place flashing around openings and joints where water could enter. Make sure the pieces overlap correctly and lie flat.
Poor flashing work is one of the biggest causes of roof leaks. Take your time here. A carefully installed flashing system protects the roof where it is most vulnerable.
Start laying new shingles.
Now you are ready for the visible part of the roof.
Begin at the bottom edge and work upward. This is important because each higher row should overlap the row below it, helping water run down and away from the house.
Use starter strips at the eaves if your shingle system calls for them. Then install the first row of shingles so they line up evenly with the edge.
As you go, make sure each shingle overlaps properly. Gaps or bad alignment can create weak spots where wind and water can get in.
Nailing pattern and spacing
Nails must go in the right place. Too high, too low, or too few nails can cause shingles to lift or fail. Too many can damage the material.
Follow the manufacturer’s instructions carefully. Most shingles require a specific number of nails in a specific pattern. This is not the place to guess.
A good nailing pattern helps your roof resist wind and stay sealed over time.
Continue up the roof in rows.
Once the first row is secure, continue working row by row upward. Keep the shingles aligned so the pattern looks straight and even.
Use a chalk line if needed to help keep rows level. This makes the finished roof look cleaner and helps the shingles perform better.
Work slowly enough to stay accurate, but steadily enough to keep the job moving. Roofing is one of those projects where a patient pace often leads to the best result.
Handle valleys and roof details carefully.
Roof valleys, vents, and chimneys need extra attention. These areas are exposed to more water flow and are more likely to leak if done badly.
When you reach a valley, follow the method recommended for your roofing system. Some roofs use closed-cut valleys, while others use open metal valleys. Around vents and chimneys, use flashing to seal the area properly.
If this part feels confusing, stop and double-check the instructions for your roofing material. Details matter here. One weak corner can affect the whole roof.
Install ridge cap shingles.
When you reach the roofline, finish it with ridge cap shingles. These are made to cover the peak and protect the highest seam from wind and rain.
Ridge cap shingles are often cut from regular shingles or bought as a separate product. They are installed across the ridge so they overlap evenly on each side.
This step gives the roof a clean finish and helps protect one of the most exposed areas on the whole structure.
Final inspection
Do not assume the roof is done just because the shingles are on.
Walk around the house and inspect the roof from the ground. Check for:
- Straight lines
- Missing shingles
- Raised edges
- Visible nails
- Poor flashing placement
- Loose debris
Then seal any exposed nail heads as needed and clean up the area. Remove scraps, loose nails, and leftover materials from the yard and driveway.
A final inspection helps you catch small problems before they become big ones.
Clean up and dispose of waste
Roofing jobs make a lot of debris. Bag the waste carefully and dispose of it according to local rules. If you rented a dumpster, make sure it is used efficiently and safely.
Clean gutters, walkways, and driveways. This final step may not seem exciting, but it matters. A clean site reduces injury risks and makes it easier to spot anything that needs a second look.
Cost Breakdown of Reroofing a House
DIY cost vs professional cost
One of the biggest reasons people ask whether I can reroof my own house is cost. DIY roofing can be cheaper, but only if you account for all the expenses.
A DIY roof project usually costs less in labor, but you still pay for:
- Shingles and underlayment
- Nails, flashing, and sealant
- Safety equipment
- Tool rental or purchase
- Waste disposal
- Possible repair materials
Professional roofers charge more because they include labor, experience, speed, insurance, and warranties. That higher price often buys peace of mind.
Hidden costs to consider
Here are some costs homeowners often forget:
- Dumpster rental
- Extra plywood or decking repairs
- Replacement tools
- Permit fees
- Mistakes that need fixing
- Time off work
Sometimes a DIY job looks cheaper at first. Still, the final total can rise quickly if the project becomes more complicated than expected.
Is DIY really cheaper?
Sometimes yes, sometimes no.
If your roof is simple and you already own some tools, DIY can save money. But if your roof has damage, steep slopes, or difficult details, the savings can disappear fast.
So when you ask whether I can reroof my own house, think beyond the sticker price. Think about your time, your safety, and the cost of doing it twice if something goes wrong.
Safety Tips for DIY Reroofing
Work with another person.
Never reroof alone if you can avoid it. Having a partner makes the job safer and easier. One person can help by passing tools, watching for hazards, and calling for help if something goes wrong.
Use ladder safety rules.
A ladder must be placed on stable ground and set at the correct angle. Make sure it extends far enough above the roof edge, so you have something secure to grab when climbing on and off.
Never rush up or down a ladder with tools in your hands. Use a tool belt or a rope system to move materials safely.
Watch the weather
Do not work in rain, high wind, or extreme heat. A roof surface can become slippery very quickly, and weather can change faster than expected.
If the forecast looks uncertain, wait. A delay is better than an accident.
Prevent heat exhaustion
Roof work often happens in hot sun. Drink water often, take short breaks, and watch for signs of overheating such as dizziness, weakness, or headache.
A tired, overheated worker makes more mistakes. Keep your body in good shape throughout the job.
Be careful around electrical hazards.
Watch for overhead power lines and any electrical components near the roof. Keep metal ladders and tools well away from lines. If your work area feels risky, stop and assess before moving forward.
Common Mistakes to Avoid
Incorrect nailing
Bad nailing is one of the most common roofing errors. Nails placed too high, too low, or at the wrong angle can cause shingles to loosen or leak.
Skipping underlayment
Some homeowners try to save time by skipping underlayment. That is a mistake. Underlayment is a major layer of protection and should not be ignored.
Poor shingle alignment
Uneven rows may seem like a cosmetic issue, but they can also affect water runoff and wind resistance. Keep your lines straight as you work.
Forgetting ventilation
Roof ventilation helps control heat and moisture in the attic. If your roof needs vents or existing vents are blocked, address them during the reroofing process.
Working in bad weather
This is one of the easiest mistakes to avoid. If conditions are poor, wait. A roof is no place to take chances.
When You Should Hire a Professional Roofer
Complex roof structures
If your roof has many angles, valleys, dormers, chimneys, or skylights, the job is more complicated than a beginner project would be. Professionals know how to handle these details more safely.
Severe damage or leaks
If the roof deck is severely damaged or you have widespread leaks, the issue may be more than a simple reroof can address. A professional can inspect the structure and recommend the right repair.
Lack of experience
If you have never done roofing before, a full DIY replacement may be too much for your first major project. There is no shame in starting with smaller home repairs first.
Tight time limits
Roofing takes time. If bad weather is coming or you need the job finished quickly, a professional crew may be the better choice.
Warranty concerns
Some roofing materials and manufacturer warranties require proper installation. If the product is installed incorrectly, the warranty may not help you later.
Maintenance Tips After Reroofing
Inspect the roof regularly.
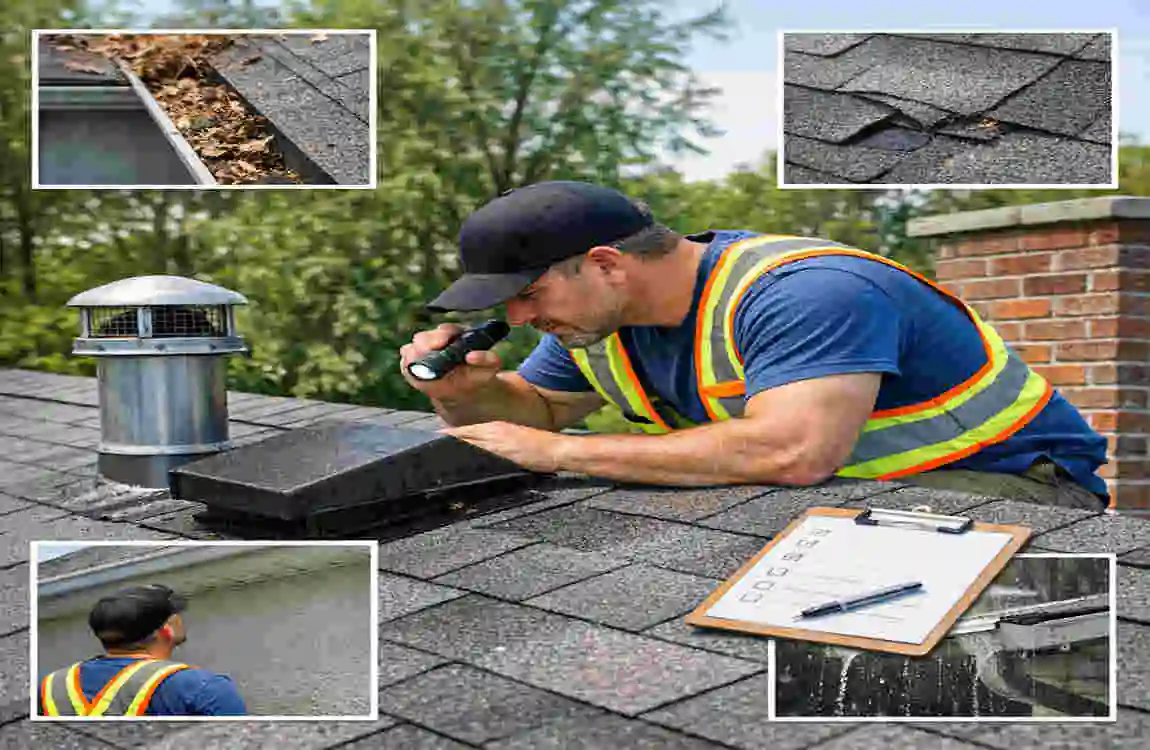
A new roof still needs attention. Check it at least twice a year and after major storms. Look for loose shingles, damaged flashing, and signs of wear.
Clean gutters
Clogged gutters can force water back onto the roof edge. Keep them clean so water can drain the way it should.
Watch for loose shingles.
If you spot a shingle that is lifting, curling, or missing, fix it quickly. Small problems are easier and cheaper to handle early.
Set a seasonal maintenance routine.
A simple routine helps your roof last longer. For example:
- Spring: Check for winter damage
- Summer: Look for heat wear and ventilation issues
- Fall: Clean gutters and clear debris
- Winter: Watch for ice buildup and leaks
Consistent care protects your work and extends the life of the roof.
FAQs
Can I reroof my own house without experience?
Yes, but only if the roof is simple and you are willing to learn carefully. If you have no experience, start by studying the process, watching trusted tutorials, and reviewing local code requirements. If your roof is steep or damaged, hire a professional instead.
Do I need a permit to reroof my house?
In many places, yes. Permit rules vary by city, county, and state. Always check with your local building department before starting. A permit can help ensure the work is legal and inspected properly.
How long does it take to reroof a house DIY?
It depends on the roof size, shape, and your skill level. A simple roof might take a weekend or two for experienced DIYers. For first-time homeowners, it can take much longer. Planning and weather also affect the timeline.
What is the easiest roofing material to install?
For most homeowners, asphalt shingles are the easiest roofing material to install. They are common, widely available, and generally more beginner-friendly than metal, tile, or flat roof systems.
Is reroofing dangerous for homeowners?
Yes, roofing is dangerous if you do not take proper precautions. Falls, heat stress, tool injuries, and weather exposure are all real risks. That is why safety gear, a helper, and careful planning are so important.
| Stage | Description | |
|---|---|---|
| Roof Inspection | Check the existing roof for leaks, damage, rot, or weak structure to determine if reroofing is needed. | |
| Material Selection | Choose roofing materials (asphalt shingles, metal, tiles, etc.) based on budget, climate, and durability. | |
| Planning & Permits | Obtain necessary permits and plan the project timeline, tools, and safety measures. | |
| Old Roof Removal | Remove old shingles, underlayment, and debris to expose the roof deck. | |
| Deck Repair | Inspect and repair the roof deck (plywood/wood base) if there is any damage or decay. | |
| Install Underlayment | Lay waterproof underlayment or roofing felt to protect against moisture. | |
| Install New Roofing | Place new shingles, tiles, or metal sheets starting from the bottom and working upward. | |
| Flashing & Sealing | Install flashing around chimneys, vents, and edges to prevent leaks. | |
| Final Inspection | Check alignment, sealing, and overall installation quality for safety and durability. | |
| Cleanup | Remove debris, nails, and leftover materials from the site. |